들어가며
이전에 WSGI 서버를 직접!! 만들어보자라는 게시글을 통해 WSGI 서버를 만들어보았다. WSGI만 하면 아쉬우니 이번에는 ASGI 서버를 만들어보도록 하겠다.
전체 코드는 깃허브에서 확인해 볼 수 있다.
ASGI
WSGI는 Web Server Gateway Interface의 약자다. 그럼 ASGI는 어떤 단어들의 약자일까?
정답은 Asynchronous Server Gateway Interface의 약자이다. 이름을 보면 알 수 있듯이, ASGI는 비동기 처리가 가능한 서버 인터페이스이다.
동기/비동기에 대해서 궁금하다면 해당 게시글로!
ASGI 공식문서를 보면 ASGI (Asynchronous Server Gateway Interface) is a spiritual successor to WSGI 라고 쓰여있다. ASGI는 WSGI의 정신적으로 계승했다는 것인데 그 말대로 WSGI와 전체적인 구조가 비슷하다.
CPython의 GIL
자바의 경우 한 요청당 하나의 스레드가 배정된다. 이렇게 되면, 여러 개의 요청이 들어와도 동시에 처리할 수 있다.
그런데 이전의 WSGI는 왜 스레드를 사용하지 않고, 여러 개의 프로세스를 사용했을까? 안타깝게도, 이는 CPython의 GIL때문이다.
GIL이란 Global Interpreter Lock의 약자로, Python에서 하나의 스레드가 활성화되면 다른 스레드는 활성화되지 않도록 락을 거는 정책이다. 그래서 스레드를 여러 개 만들어도 제대로 실행되는 스레드는 단 하나밖에 없다. 그래서 멀티 프로세스로 처리하게 된 것이다.
동시성과 병렬성
병렬성은 정말, 여러 개가 동시에 작업을 처리하는 것을 의미한다. 컴퓨터 두 대로 동시에 작업을 하는 경우가 바로 병렬성이다.
동시성은 짧게 짧게 일을 처리함으로써 동시에 처리되는 것처럼 보이는 것이다. 여러 개의 스레드가 하나의 cpu를 0.1초 동안 점유하면서 일한다고 생각해 보자. 전체 실행 시간은 늘어나겠지만, 동시에 진행되는 것처럼 보일 것이다.
CPython?
python은 인터프리터 언어로, python으로 작성된 스크립트를 실행시켜 주는 실행기가 존재한다. 이 실행기는 C, Java 등등의 언어로 작성되어 있다. 이때 C로 작성된 실행기를 CPython이라고 부른다. 맨 처음 Python이 릴리즈될 때 사용된 것이 CPython이고 대부분 CPython을 사용한다.
여기에 비동기를 한 스푼
잘 생각해 보면, 실행 로직이 CPU bound인 작업은 정말 웬만하면 처리 시간이 엄청 짧다. 문제인 것은 바로 네트워크 I/O이다. 예를 들어, DB 연결, 외부 API 호출 등등 네트워크를 사용하면 생각보다 딜레이 되는 시간이 많다. 그런 남는 시간에 CPU bound 작업을 처리한다면 매우 효율적이지 않을까?
그래서 탄생한 것이 ASGI다.
Python에서 비동기를 사용하는 방법
동기 코드
import requests
def get_response():
    response = requests.get("https://www.naver.com") # 이 부분에서 3초가 걸림
    print(response.text) # 1
    return response

def sum(a:int, b:int):
    result = a + b
    print(result) # 2
    return result

get_response()
sum(1, 2)
자, 이런 코드가 있다고 해보자. 이 코드는 1번이 출력되고, 2번이 출력될 것이다. get_response에 3초가 걸린다고 하더라도 순서대로 진행될 것이다.
근데 우리는 이 requests.post에 낭비되는 3초가 너무 아깝다고 생각한다. 이 3초 동안 sum을 실행시켜 보자.
비동기 코드
import asyncio
import aiohttp # pip install aiohttp
async def get_response():
    async with aiohttp.ClientSession() as session:
        async with session.get("https://www.naver.com") as response: # 이 부분에서 3초가 걸림
            print(await response.text()) # 1
    return response

async def sum(a:int, b:int):
    result = a + b
    print(result) # 2
    return result

async def main():
    # 비동기 등록
    task1 = asyncio.create_task(get_response())
    task2 = asyncio.create_task(sum(1, 2))

    await task1
    await task2

asyncio.run(main())
이 코드를 실행시키면, 2번이 먼저 출력되고, 1번이 출력되는 것을 볼 수 있다. http 요청에 3초가 걸릴 때, 이 시간에 다른 작업(sum)을 진행한 것이다.
ASGI 구현
이제 python에서 비동기를 사용하는 방법도 알아보았으니, 본격적으로 ASGI를 구현해 보자.
WSGI랑 마찬가지로 Application과 Server로 구성되어 있다. Application은 앞으로 app이라고 부르겠다.
ASGI Application
간단한 app의 구현체는 아래와 같이 생겼다.
class SimpleASGIApp:
    def __init__(self):
        pass

    async def __call__(self, scope, receive, send):
        await send({
            'type': 'http.response.start',
            'status': 200,
            'headers': [
                [b'content-type', b'text/plain'],
            ]
        })
        await send({
            'type': 'http.response.body',
            'body': b'Hello, world!',
        })

await app(scope, receive, send)
- scope: WSGI의 environ과 같은 역할
- receive: app은
await receive()처럼 receive를 호출해 request body를 가져올 수 있음 - send: response를 하려면 해당 함수를 호출해야 함
ASGI Server
import asyncio
from fast_api_app import app

class MyUvicorn:
    def __init__(self, host: str, port: int, app):
        self.host = host
        self.port = port
        self.status = 200
        self.headers = []
        self.body = b''
        self.app = app

    # 서버 시작
    async def start_server(self):
        self.server = await asyncio.start_server(self._request_handle, self.host, self.port)

        async with self.server:
            await self.server.serve_forever()

    # HTTP 요청 처리
    async def _request_handle(self, reader: asyncio.StreamReader, writer: asyncio.StreamWriter):
        data = b''
        while True:
            data += await reader.read(100)

            # 데이터를 읽고, feed_eof를 매번 호출해주어야 at_eof를 확인할 수 있음.
            # 참고) https://docs.python.org/3.10/library/asyncio-stream.html#asyncio.StreamReader.at_eof
            reader.feed_eof()
            if reader.at_eof():
                break

        # 만약 빈 값을 받았다면, 연결 종료
        if data == b'':
            writer.close()
            await writer.wait_closed()
            return

        data = data.replace(b'\r\n', b'\n')
        splited_data = data.split(b'\n\n', 1)

        # body, header, http_info 추출
        if len(splited_data) == 2:
            b_header, b_body = splited_data
        else:
            b_header = splited_data[0]
            b_body = b''

        _, b_path, _ = b_header.split(b'\n')[0].split(b' ')
        if b'?' in b_path:
            b_uri, b_query_string = b_path.split(b'?')
        else:
            b_uri, b_query_string = b_path, b''

        headers = b_header.split(b'\n')

        http_info = headers[0].decode()
        method, _, http_scheme_and_version = http_info.split(' ')
        uri, query_string = b_uri.decode(), b_query_string.decode()
        http_scheme, http_version = http_scheme_and_version.split('/')

        headers = headers[1:]

        headers = list(map(lambda x: x.split(b': ', 1), headers))
        headers = [[key, value] for key, value in headers]

        # asgi scope 제작
        # 참고) https://asgi.readthedocs.io/en/latest/specs/www.html#http-connection-scope
        scope = {
            'type': 'http',
            'asgi':{
                'version':'2.4',
                'spec_version':'2.0'
            },
            'http_version': http_version,
            'method': method,
            'scheme': http_scheme,
            'path': uri,
            'raw_path': b_uri,
            'query_string': query_string,
            'headers': headers,
            'client': writer.get_extra_info('peername'),
            'server':('127.0.0.1', 9000),
        }

        # receive 함수 제작
        # asgi app은 해당 함수를 통해 body 데이터를 수신함
        # 참고) https://asgi.readthedocs.io/en/latest/specs/www.html#request-receive-event
        async def receive():
            return {
                'type': 'http.request',
                'body': b_body
            }

        # send 함수 제작
        # asgi app은 해당 함수를 통해 response를 반환함
        # 참고) http.response.start => https://asgi.readthedocs.io/en/latest/specs/www.html#response-start-send-event
        # 참고) http.response.body => https://asgi.readthedocs.io/en/latest/specs/www.html#response-body-send-event
        async def send(options:dict):
            if options['type'] == 'http.response.start':
                self.status = options['status']
                self.headers = options['headers']
            elif options['type'] == 'http.response.body':
                self.body = options['body']

        # app에게 처리하라고 전달
        await self.app(scope, receive, send)

        # 처리 종료 후 response 제작
        response_first = f"{http_scheme_and_version} {self.status}\r\n"
        response_header = b"\r\n".join(
            list(map(lambda x:x[0]+b": "+x[1], self.headers))
        )
        response = response_first.encode() + response_header + b'\r\n\r\n' + self.body

        # 소켓을 통해서 응답
        writer.write(response)
        writer.close()
        await writer.wait_closed()


uvicorn = MyUvicorn('127.0.0.1', 1026, app)
asyncio.run(uvicorn.start_server())
기본적인 구조는 WSGI랑 매우 유사하다.
- 소켓에서 데이터를 받아와서 scope 제작
- body 부분은 bytes 형태 그래도 receive 함수를 통해 반환하도록
- send를 통해 받아온 response header와 response body를 하나로 합쳐서 소켓으로 전달
결과
테스트도 빼놓을 수는 없다. 이번에는 두 가지의 테스트를 진행했다.
[조건]
- 0.1초 단위로 요청 전송
- 동시에 1000명 접속
- MyGunicorn의 경우 worker = 16 으로 진행
- 아래 코드와 같이 2초 sleep하고 진행
## asgi - FastAPI
@app.get("/hello_world/{id}")
async def hello_world(request: Request, id: int, abcd:int = 0):
    await asyncio.sleep(2)
    return {
        id:abcd
    }
## wsgi - django
class HelloWorld(GenericAPIView):
    def get(self, request: Request, id:int):
        print(id)
        time.sleep(2)
        return Response({
            id: request.GET['abcd']
        })
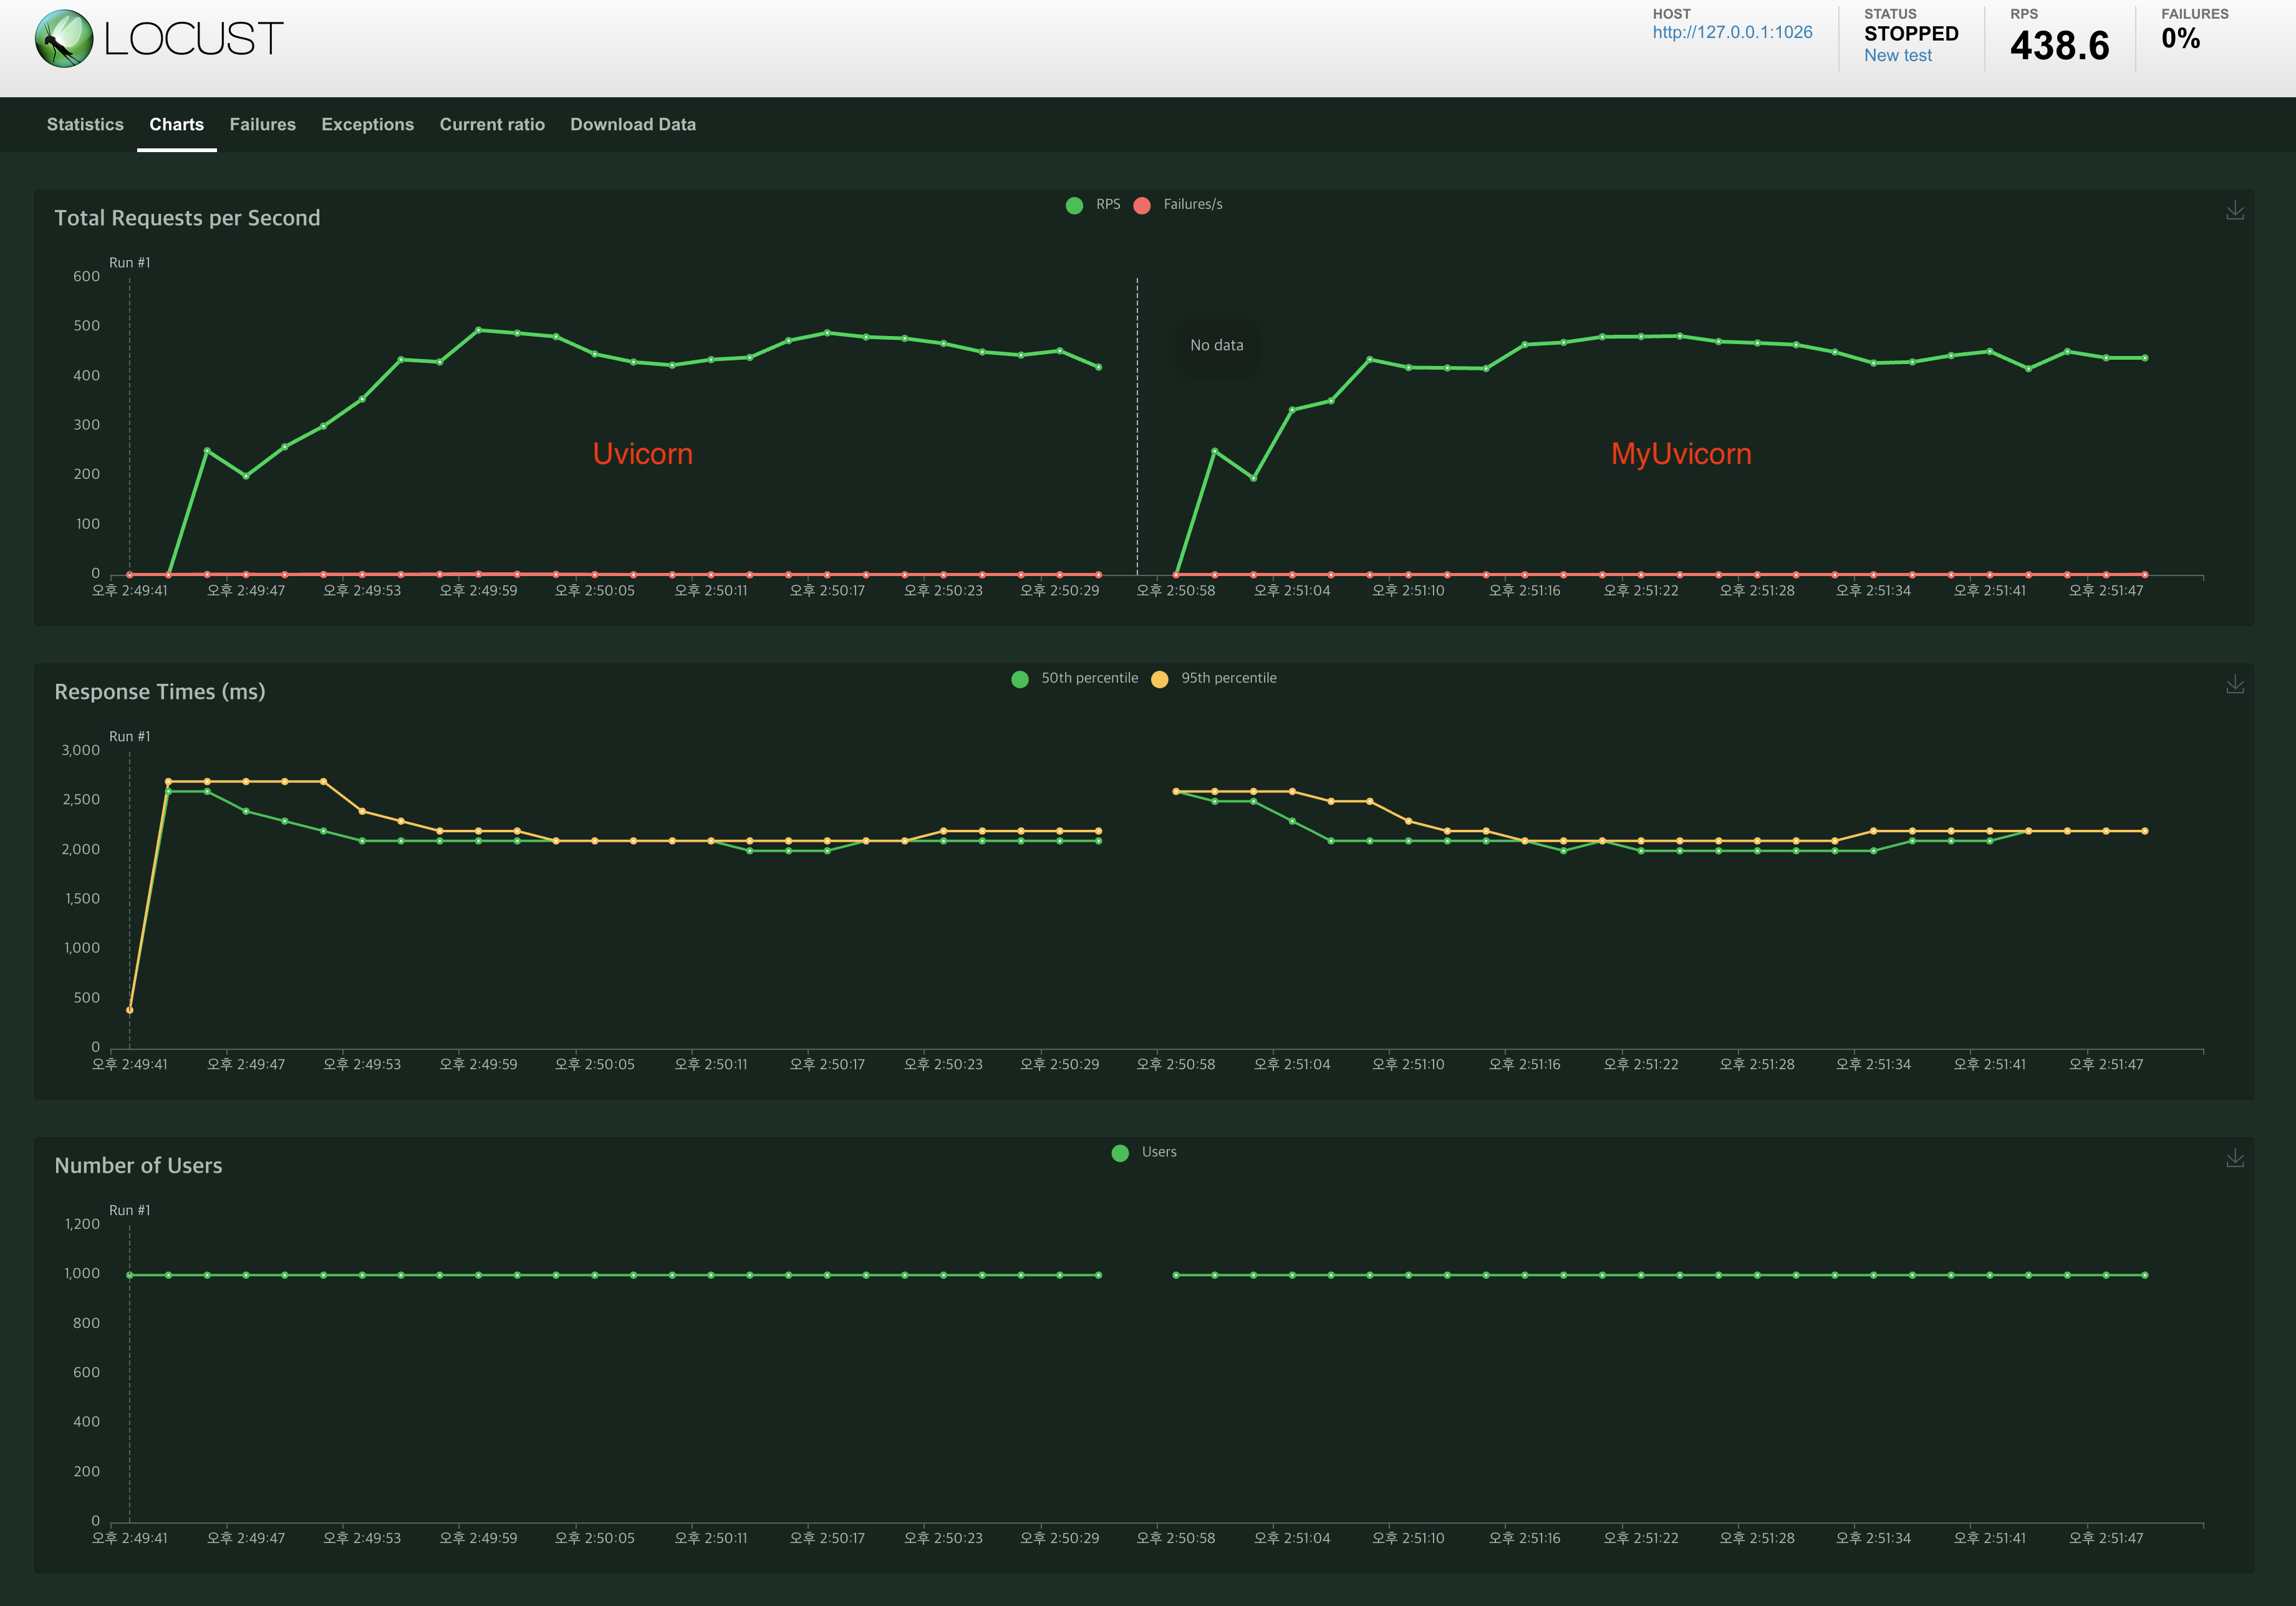
Uvicorn vs MyUvicorn
ASGI vs WSGI

총평
각 요청당 2초 딜레이됐을 뿐인데도, 16개의 프로세서가 작동하는 동기 방식이 매우 성능이 떨어지는 것을 볼 수 있다. 확실히 네트워크 I/O가 자주 발생할 경우에는 비동기 방식이 필수라고 생각이 된다.
또한 Uvicorn과 MyUvicorn이 성능에서 큰 차이를 보이지 않는 것을 확인했다. 하지만 간단한 상황에서만 비슷한 것이고, 실제 복잡한 상용 서버에 적용하기에는 문제가 있을 것이다.
오늘도 ASGI를 성공적으로 구현했다. WSGI에 이어, 매우 재미있었다. 아마도 다음에는 golang의 goroutine을 이용한 동시성 프로그래밍을 진행해 볼 것 같다.